
Repurposed Piano to a Sewing Desk
This is a step-by-step process, with pictures, showing how I repurposed a piano into a sewing desk.

Repurposed old upright piano
A piano – what do you do with it when you don’t play it anymore; don’t want it anymore? I’ve had an old, upright piano in my basement for YEARS. I used to play it quite a bit, but over the years I’ve just lost interest. It was out of tune and some parts of it were broken or just didn’t work anymore.
Well, thanks to Pinterest (again), there are great pins for a repurposed piano. Office/computer desks, wine bars, sink vanities, coat racks, etc., etc. But of course, I wanted to repurpose my piano into something that I couldn’t find on Pinterest. A sewing desk. I had to do some brainstorming how to do that.
I told my husband about the re-purpose plan I had for the piano. He looked at me like I was nuts. Then bless his heart, he said, “OK, let’s gut that thing.” So, we tore into it.
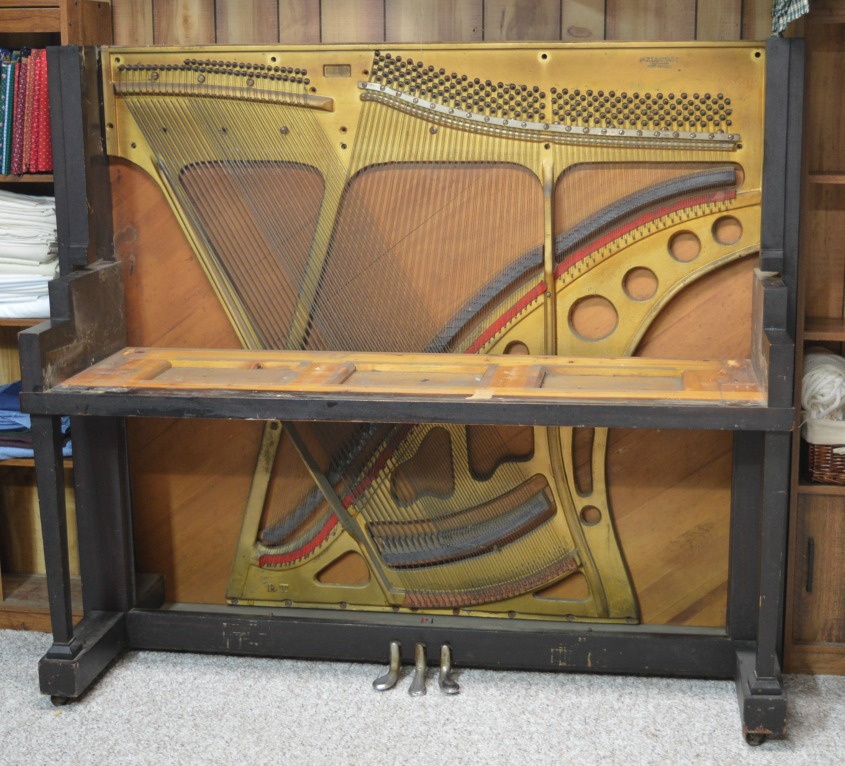
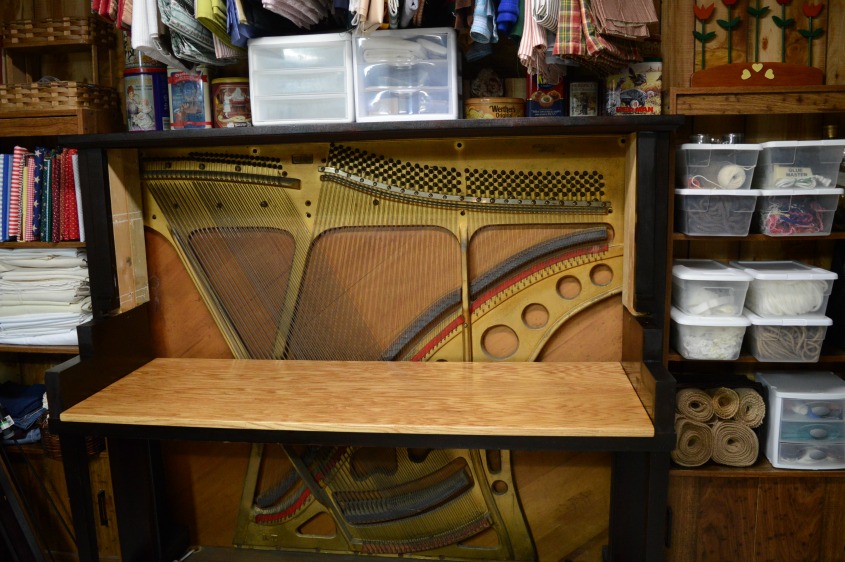
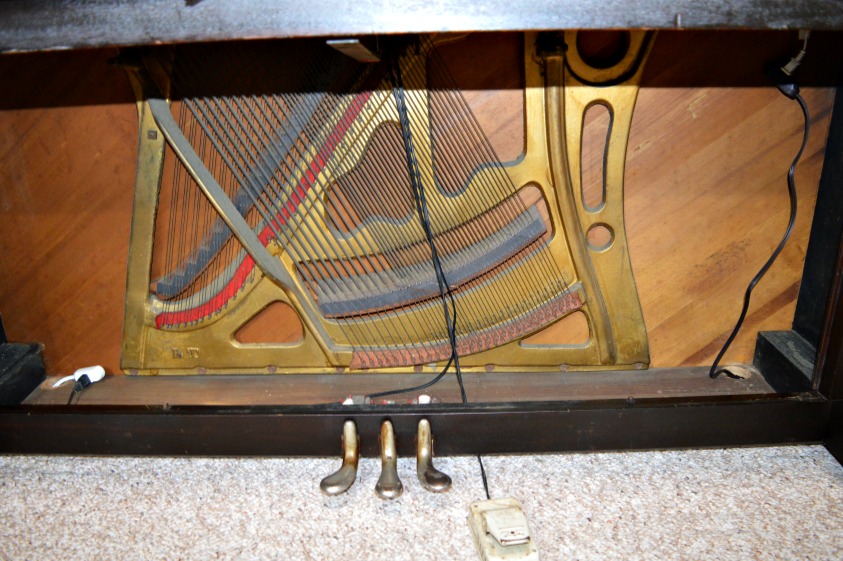
Removing piano parts to upcycle
We unscrewed and removed parts and pieces until we got down to what you see in the photo below. We tried to find a way to remove the piano harp that’s on the back wall of the piano, but those things are apparently put in there to STAY! I’ve read that those old upright piano harps are made from cast iron and weigh a few hundred pounds.
I’ve also read warnings about the strings on the harp too. The string tension is so tight and strong that if one of them would break, it could cause severe injury, such as cut off a finger or a hand. We thought about sawing the entire back wall off the piano to remove it, but again, that thing weighs a few hundred pounds. We left it on there.
DIY shelving and desktop insert for a piano
After some brainstorming, I decided to make a wooden shelving insert out of plywood to slide into the upper cavity of the piano. I drew plans for the insert on graph paper and then purchased a 4’ x 8’ sheet of ¾” sanded oak plywood. Based on the measurements from my drawing, my husband helped me saw a 56” x 20” piece for the slide-in desktop.
We then sawed another piece 56” x 26” for the back wall. My design plan also included shelves on this back wall to store my sewing supplies. I purchased two 8-foot, premium pine 1” x 6” boards for the shelving. I also purchased an 8-foot piece of trim. The trim would be used to cover the raw front edge of the plywood piece used for the desktop.
Piano modification for the wood shelving insert
The back wall/shelving insert could not be screwed to the piano’s back wall because of the cast iron piano harp. I would need to attach it to each side of the piano. However, I would first need to fill in the inset areas on each side.
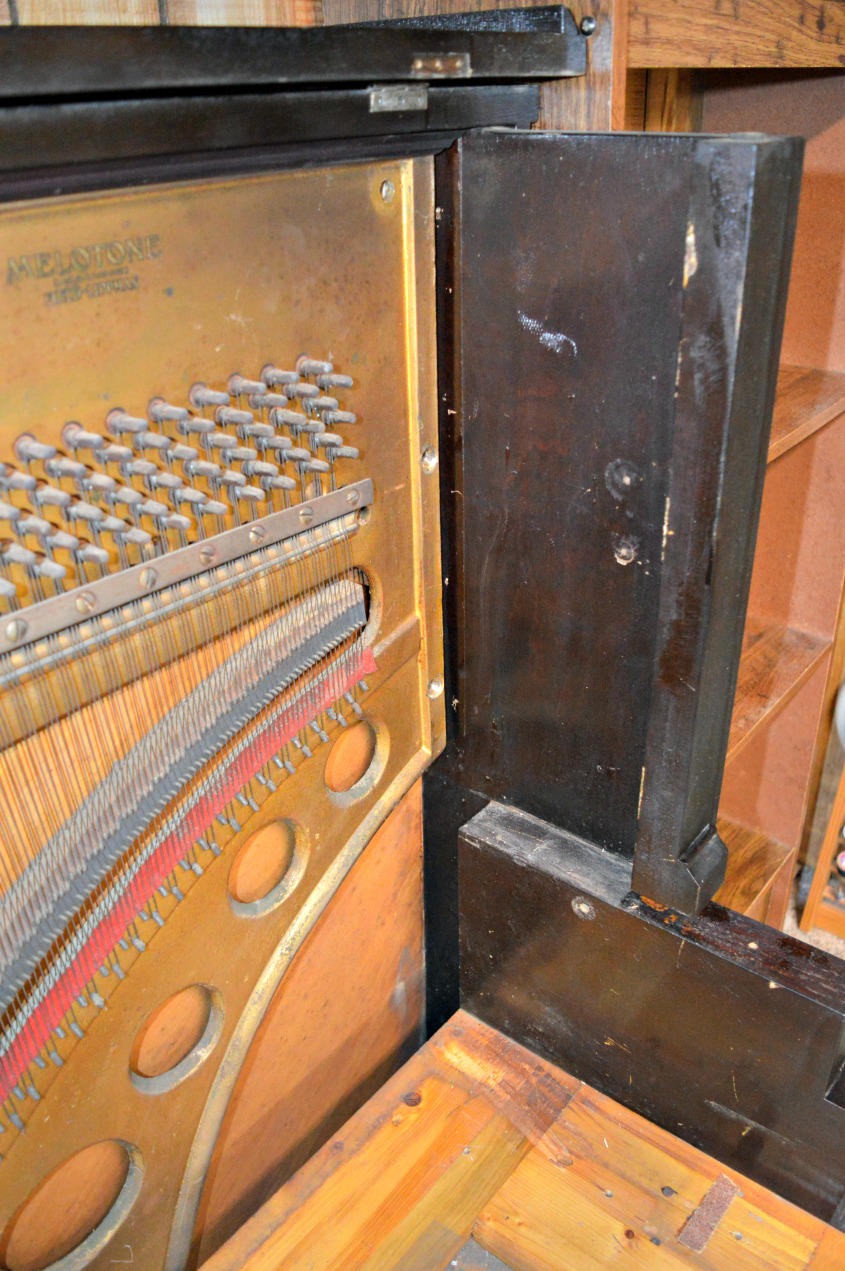
I filled in those inset spaces by screwing some 2” x 4” pieces into each inner side of the piano. It was now ready for the back wall/shelving insert.

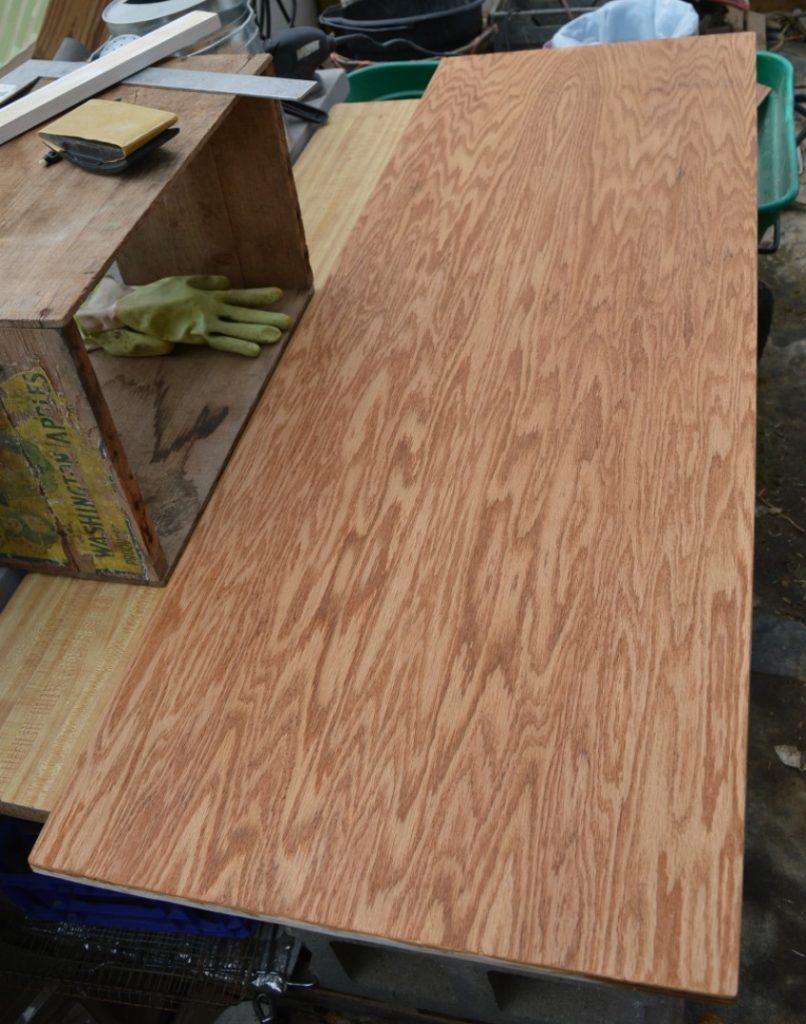
Staining plywood for the DIY slide-in desktop
The sanding and staining began on the desktop. Didn’t the stain bring out beautiful wood grain in the oak plywood? This is going to be a sewing desk work surface, so I applied four coats of polyurethane for protection.
The application of stain and polyurethane was completed on the desktop. I placed it on the surface of the piano where the keys used to be. I then stained the trim, and when dry, nailed it to the front raw edge of the plywood desktop.
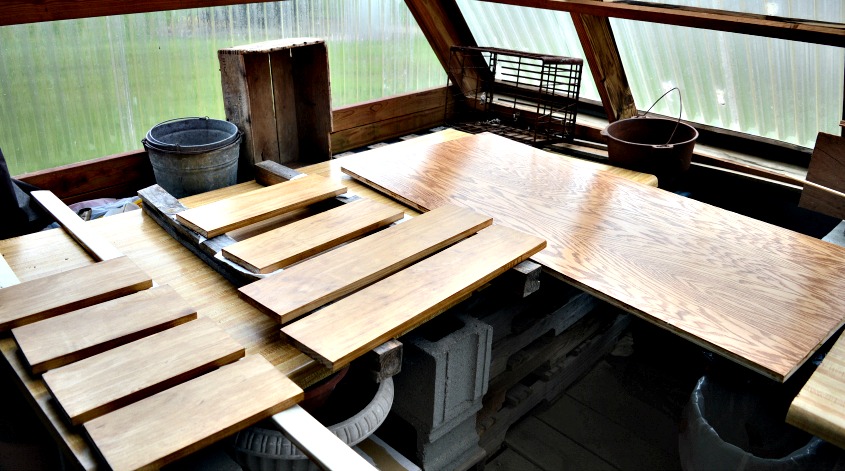
DIY construction of wood shelving insert for piano upcycle
In the photo below are the 1” x 6” pieces that I sawed for the shelves based on the measurements of my design plan. Also shown in the photo on the right is the 56” x 26” plywood for the back wall. I stained all pieces and applied two coats of polyurethane.
(My greenhouse serves as my woodworking shop sometimes)
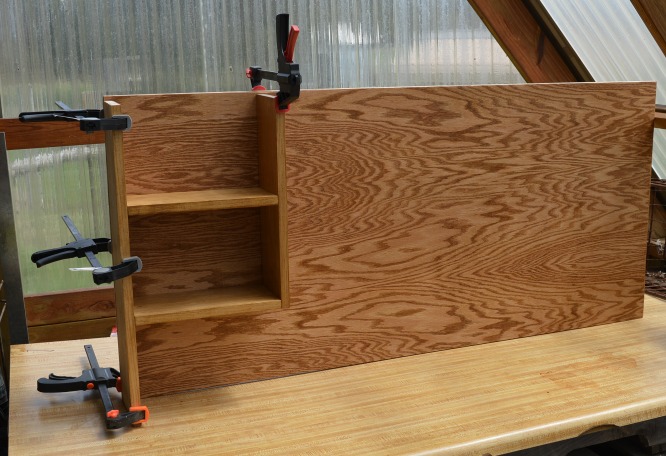
After polyurethane dried on all pieces, I assembled and attached the shelving to one end of the back wall. I repeated that step on the other end of the wall.
DIY piano shelving insert completed
My husband helped me carry the insert into the basement and set it on the piano. We placed it on the desktop and slid it as far back as it would go against the piano harp. On the inside walls of the insert, I screwed each side to the 2” x 4” pieces mentioned earlier. I placed my sewing machine on the desk and the next step would be routing the sewing machine cords so they wouldn’t be seen.
Sewing machine cord routing in the repurposed piano
Please note – Newer machines have cords that unplug from the machine, however mine is not made that way. My husband had to disconnect the power cord and foot-pedal cord from the sewing machine to make it possible for the cords to go through the holes we drilled that’s discussed in this section. He then reconnected them to the sewing machine after they had been run through all openings.
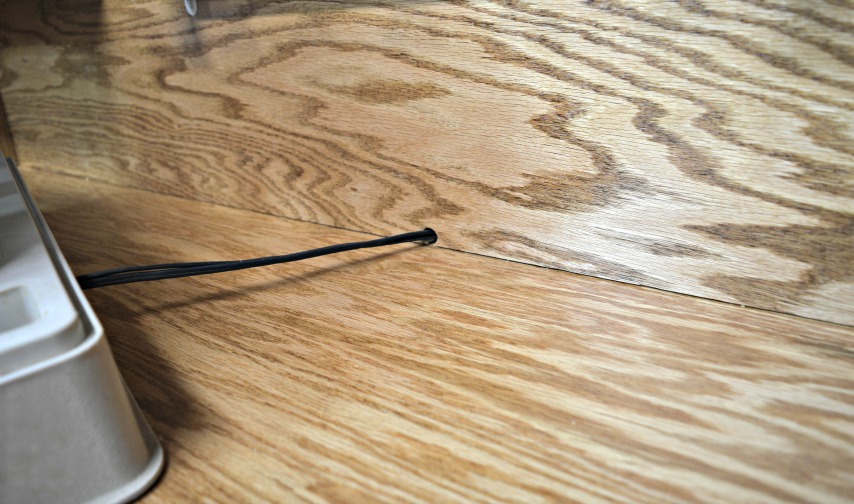
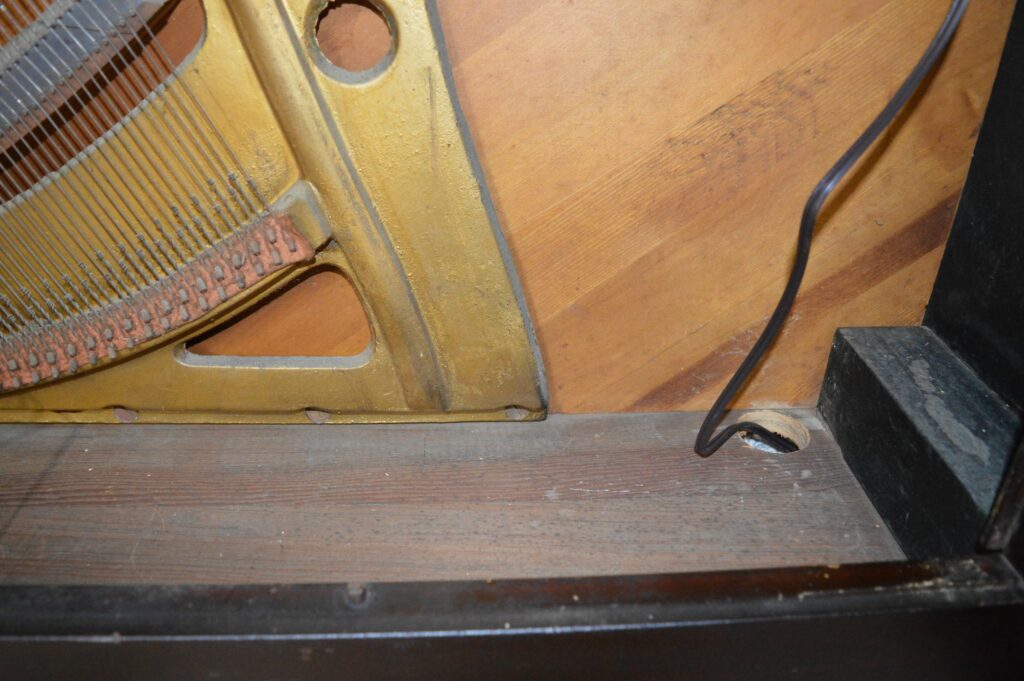
In the lower mid-section of the back wall, I drilled a small ¾” hole. The sewing machine power cord and foot-pedal cord go through that hole and run down to the floor of the piano. The hole is behind the sewing machine so it’s not easily seen.
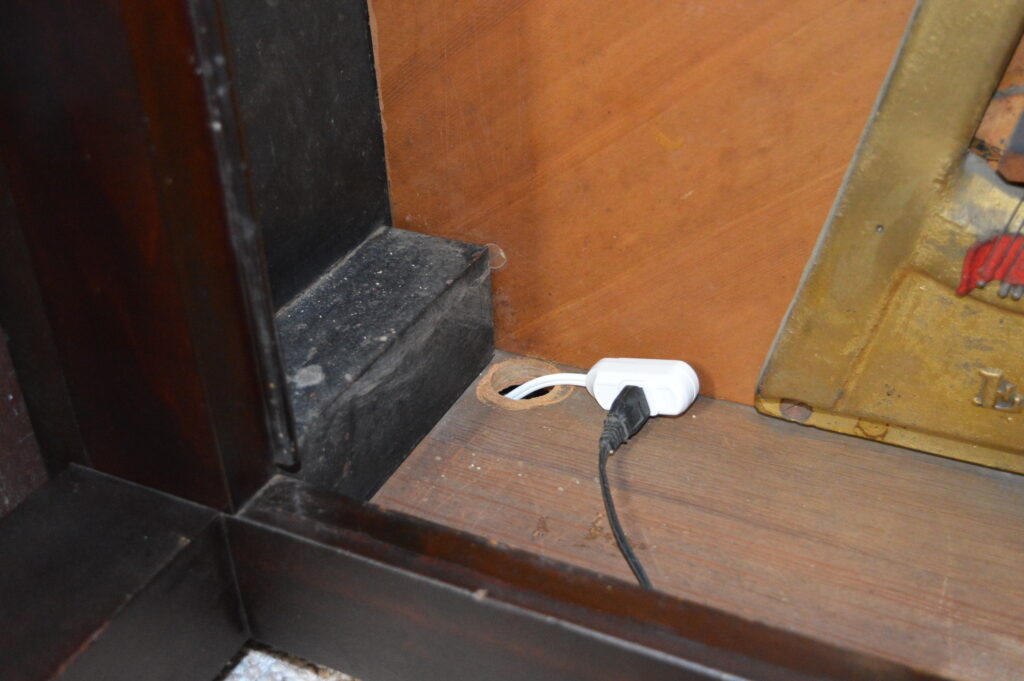
The sewing machine power cord would not reach a wall outlet. It would require an extension cord. I drilled a 2-inch hole in the floor of the piano on the left side. I then ran an extension cord from a wall outlet. It went underneath the piano and up through the hole I drilled in the piano floor. The photo below shows the sewing machine power cord plugged into that extension cord.
Warning – My husband had already reconnected the power cord to the sewing machine before we plugged it into the extension cord.
Additional access holes for other power cords
I drilled another hole in the middle of the piano floor, which was needed for the sewing machine foot-pedal cord to go through. (Those are wine bottle corks that you see in the lower part of the picture. I pushed the corks down over some sharp metal rods that are sticking up.)
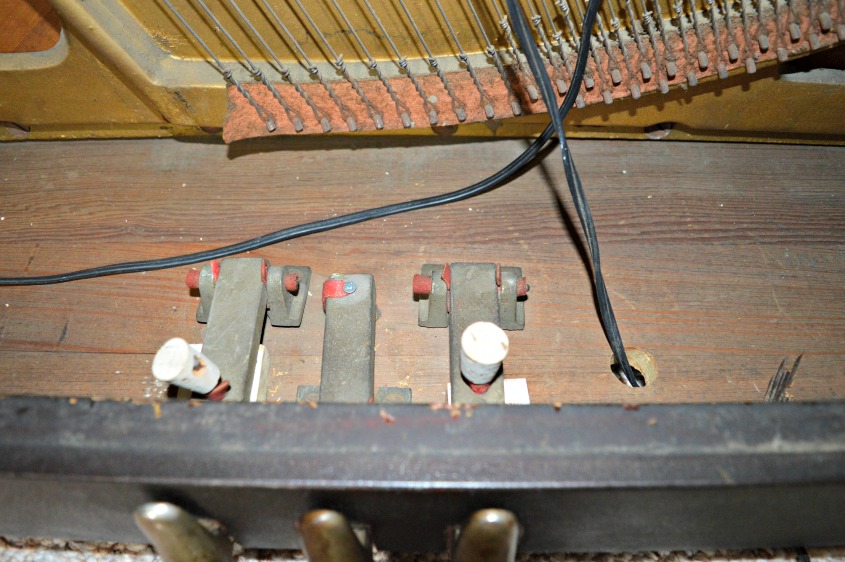
The sewing machine foot-pedal will stay on the floor in front of the piano. Its cord runs underneath the piano and up through the middle hole I drilled in the piano floor. It then runs up behind the back wall/shelving insert along with the sewing machine power cord.
Both cords come out through the small hole that I drilled in the back wall/shelving insert to the sewing machine. My husband then reconnected the foot-pedal cord to the sewing machine.
Overhead lighting
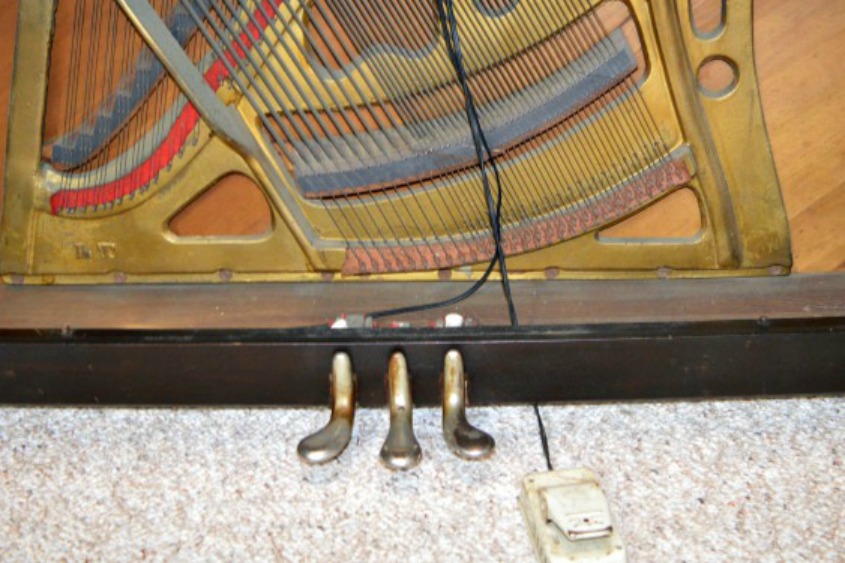
Lighting was needed above my sewing machine inside the piano sewing desk. I purchased an under-the-cabinet light that’s often used in kitchens. I knew the power cord would not reach a wall outlet, so I drilled a third hole in the piano floor on the right side for an extension cord to run through.
The power cord for the overhead light runs down behind the back wall/shelving insert. The extension cord runs underneath the piano and comes up through the hole. The overhead light is plugged into the extension cord.
Overhead lighting installed
You most likely agree with me when I say the more lighting, the better when sewing.
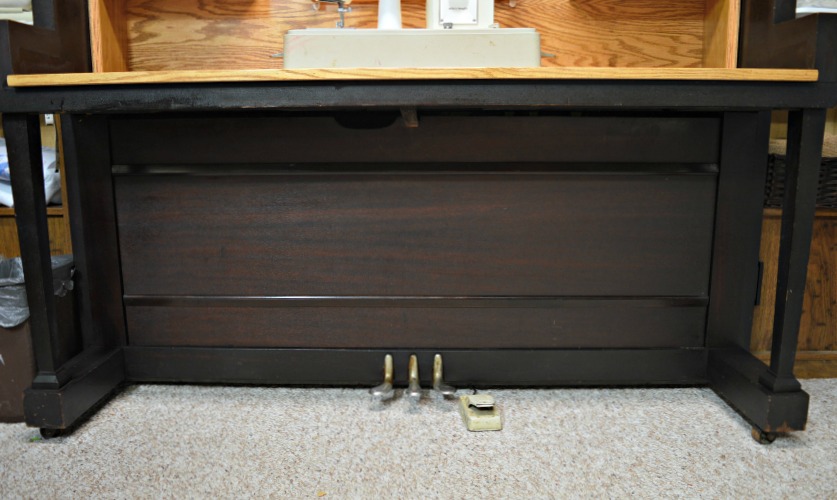
Power cords conceal
The photo below shows all cords hooked up and plugged in! But who wants to look at all those unsightly cords? Not me, so…
The piano already had a removable, lower panel. With that panel reinserted, it hides all the cords that are dangling inside.
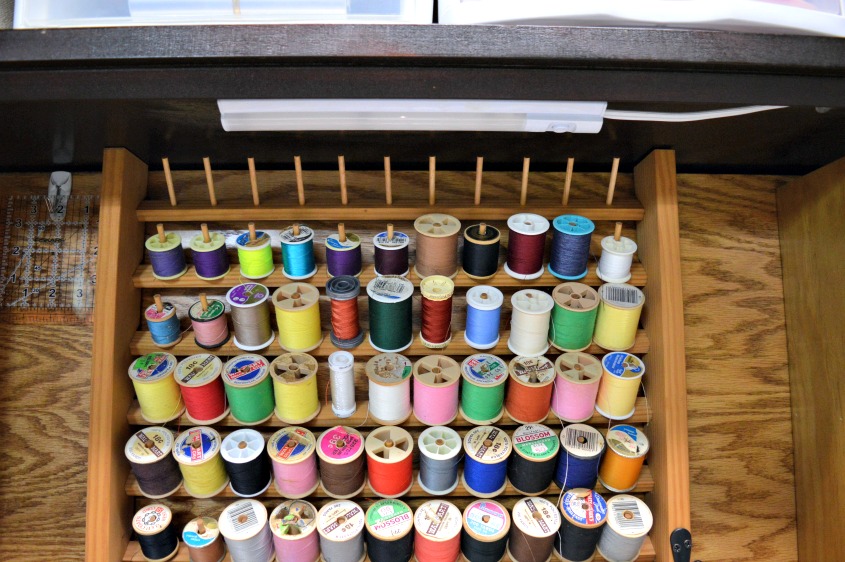
Thread-holder rack
Also, a thread-holder rack, similar to the one here, is nice and handy to have close to your sewing machine.
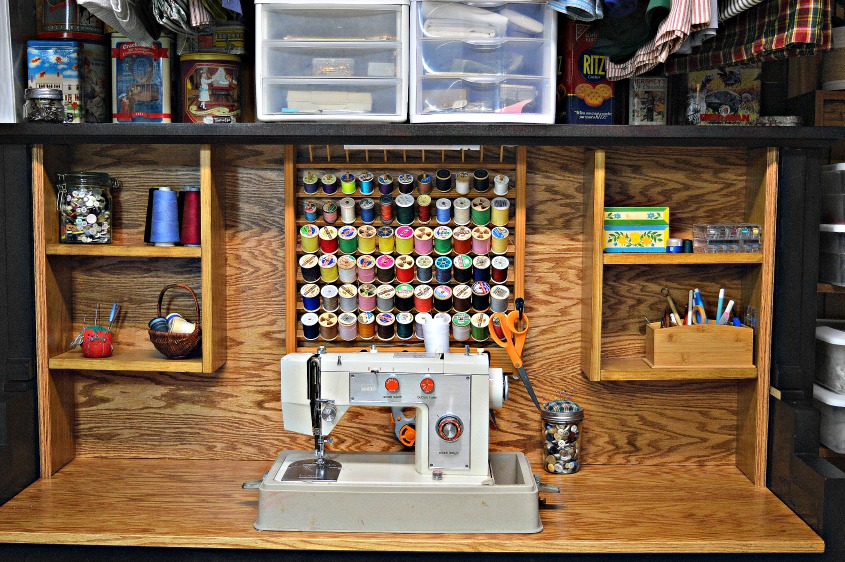
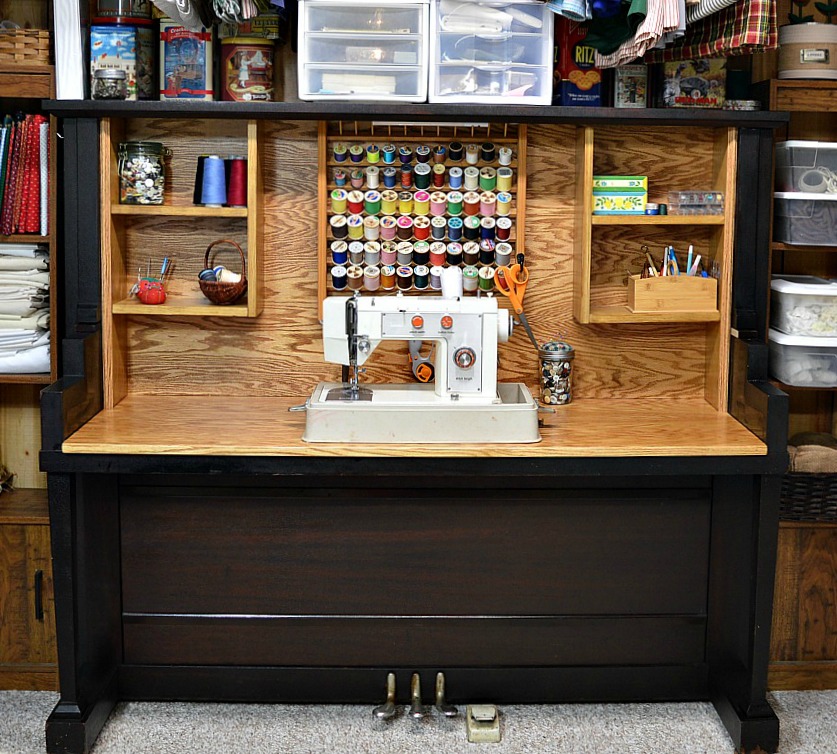
Repurposed piano project completed! Love my new sewing desk!
This was a fun project and I hope it will be of help to you if you want to repurpose a piano to a sewing desk. Please check back again for other repurpose projects!
LOVE your sewing desk! I just bought an old piano at an auction for $5! This is a perfect way for me to repurpose it into a unique and fun project! Thanks for the step by step instructions!
Thank you so much for your comment Becky! Sorry I haven’t replied back to you before now. There’s been a lot of things going on in my life that has kept me from working on my blog. Have you repurposed the piano you purchased? If so, I would love to see a picture of it!
Great looking project. Just saw it on Rescape – facebook . I have taken apart a number of these uprights with limited time . More of a service for people trying to get rid of them. The strings are easy enough to unscrew from the top pins and yes the cast is quite heavy. An overhead hoist helps.
Love what you’ve done with it. Very inspirational
Thank you and I appreciate you taking the time to comment. Hats off to you for taking apart a number of uprights, because not sure if I want to do that again. I’m sure you’ve turned several uprights into desks which is what mine could also be used for. I was surprised by some negative comments on Facebook from people who think old upright pianos shouldn’t be re-purposed. Better than those old uprights ending up in a landfill though.
Saved as a favorite, I really like your site!
Thank you!
WOW just what I was searching for. Came here by searching for blog
I love this idea…we have two antique pianos and nobody wants them. We might have to do this…wonder if I could figure out how to use the piano pedals for the machines…left for serger and right for sewing maching?!?
You could get a piano tuner’s key to loosen the tension on each piano sting, this eases the tension. I suggest making the string loose to remove any tension and make it safer. Also balance the loosening across the entire board to reduce pressure. Then use wire cutters to remove the strings. Much like easing the pressure on a guitar. Then you could remove the cast iron bridge and pin blocks. You would have more space and lighten the load, especially upon the floor. It’s a touch sad, but better than the burn pile or landfill.
This is a cleverly done DIY project, and I appreciate it for that, but if the harp and strings were relatively sound, then I can’t help but feel that this should have gone to someone who needed a piano but couldn’t afford one.
I understand your point of view but I bought this piano not long after we moved into our home 45 years ago. It has been in my basement ever since. We have remodeled/added on to our house a few times over the years. We have basically built around this piano to the point that it would be quite a challenge to move it out of our basement.
Unfortunately, most uprights have a relatively short lifespan. It becomes dangerous to retune as the harp has been under continued mass tension for decades. This happened to my piano, and it is completely untunable. I inherited it but cannot play it so it is wasting valuable space. Repurposing would mean I get to keep it and give it a useful function
Finding someone who wants to take on the expense of moving and rehoming an upright piano is easier said than done…the pianos today are much lighter and smaller..plus today musicians want an instrument that enables them to synthesize music..sad to say the old upright piano is in the same category as the rotary telephone
This repurpose popped up just the right time!! I have an old Cable upright that is no longer viable as a piano. Several years ago we saw a piano repurposed as a desk. My husband is bored this winter and we are working on a sewing/Cricut center out of my old piano. And before anyone comments, my piano will no longer hold a tune, it has a cracked base clef that is hand carved and to costly to replace as told to me by a tuner. So in order to keep a family memory, we are repurposing!! Thanks for the push to get this done!!
You can easily remove the harp by unscrewing the wires to loosen them. Then you can pull each wire out the rest of the way. Usually you can slide out the front keyboard shelf once the screws are out but someone decided to put my piano together with wood glue so we had to hack at it. The harp and strings add so much weight and take up so much space it seems a waste but if you don’t mind your sewing desk weighing a ton then it doesn’t matter.
I love this idea! I have a piano that I inherited from my grandparents. It has been unplayable for many years, and wouldn’t cope with the stress of retuning, but holds many wonderful memories for me. I was thinking to break it down for a staircase but may pinch the sewing / Cricut idea so I can keep the carcass intact. Thanks for the detailed blog!
After seeing this post, it lit a fire under my butt to do something like this to the piano sitting in my living room. I now have a computer desk that can also be used as a sewing desk as well. I haven’t covered the harp yet, but that is next on the agenda.
You might think about letting the harp show. In my mind the harp looks like artwork and would only beautify whatever you make!
I agree letting the harp show would be beautiful for repurposed piano use other than a sewing machine table. That would probably damage fabric when pushing bulky sewing projects up against the wires and hardware in the harp.
Thank you so much for this page as I searched around YouTube and Google searched to see what I can do with our 1972 no name mini upright piano which has a missing string, a few of the pads on the striker is gone and the last tuner said that this cannot be tuned anymore. We have purchased a digital keyboard but could not find a way to donate this piano and removing it costs money. So I want to do what you have done except to fit the digital keyboard on the piano’s base (I measured it and it fits well). The only thing I was not sure about was if the harp with the strings attached to the pins, undisturbed, but expose would be dangerous. It seems that covering it would work (perhaps I will get plexiglass to cover so that it still shows).
Thanks again.
I, too would be hesitant about leaving the harp exposed. I would always be concerned about a string breaking and causing a severe injury to someone. Plexiglass sounds like the perfect solution!
I love the sewing cabinet you created from an old piano. After seeing your photos, I have started on our piano. My grandsons loved removing the keys.
Thank you for the ideas. I can’t wait to get more done!
Thank you! I love to see, or hear about pianos getting repurposed. It’s a shame to think about those old treasures hauled off to a landfill or burn pile.