
How to Make a T-Shirt Quilt

DIY t-shirt quilt top: This post is a guide that I hope will be helpful to you on how to make a quilt out of t-shirts.
How to Make a T-Shirt Quilt
Our oldest grandchild graduated high school this year. He’s an athlete and has participated in a lot of sports while growing up, so he’s accumulated several team shirts.
Last fall, my daughter said she wanted to have a t-shirt memory quilt made for him as a graduation present and asked me if I would make the t-shirt quilt top.
I’ve never made a quilt top of any kind, but I told her I would. For one reason because she asked, and another reason because I love to sew. A quilt top has been on my ‘one of these days’ list for a while anyway.
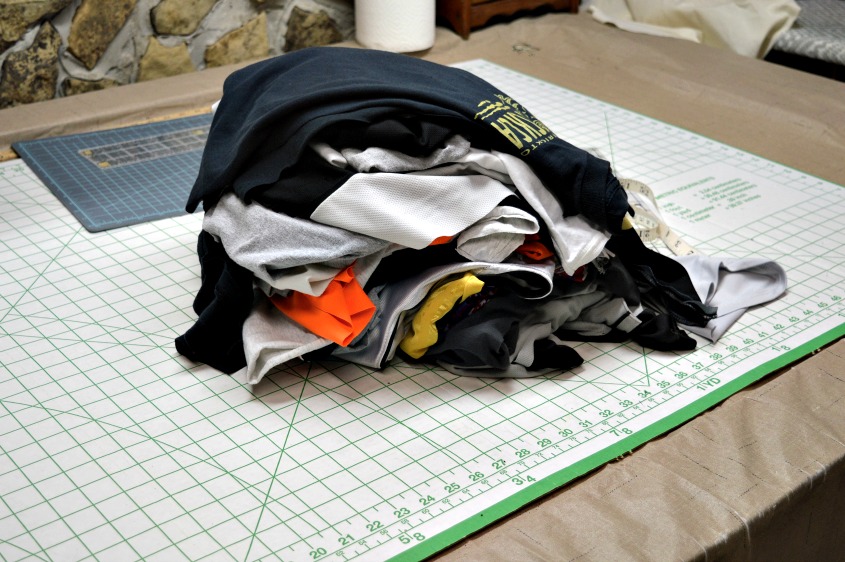
Looking at this picture now, I remember being a little stressed. This was my first rodeo and there were no do-overs.
When you purchase fabric to make a quilt and do something wrong, you can buy some more fabric and try again. I had to get it right the first time.
When she brought the shirts to me, there were 31 of them ranging in sizes he wore when he was six years old and up to the six-foot, 18 year old he is now.
How to Make a Quilt out of T-Shirts
Since I’ve never done this before, the research began in order to learn how to make a t-shirt quilt top. I spent a lot of time on Pinterest, YouTube and the world wide web in general.
I’m so glad I did because otherwise, I would not have done it correctly. I also prayed and asked Jesus to take the wheel and guide me through this.
Another tip I learned is that because t-shirt material is very stretchy and rolls up when cut, it needs a stabilizer, such as fusible interfacing. This is to be ironed onto the wrong side of the t-shirt fabric.
It can’t be a heavy interfacing, though, as that will make the quilt too stiff. It needs to be a light-weight fusible interfacing such as Pellon 906F.
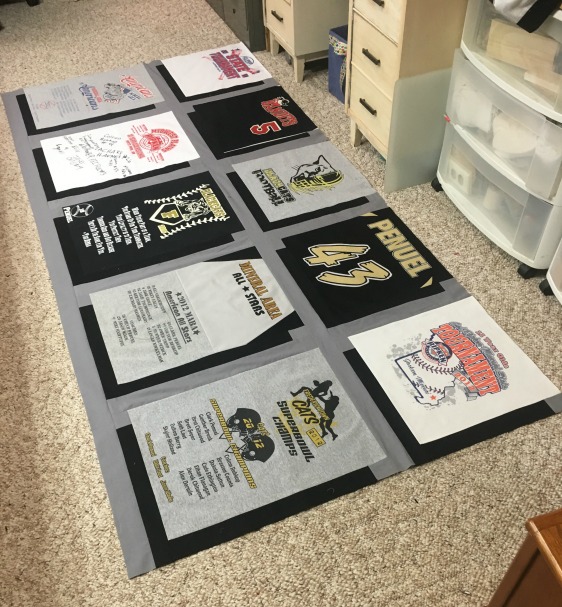
T-shirt quilt block layout pattern
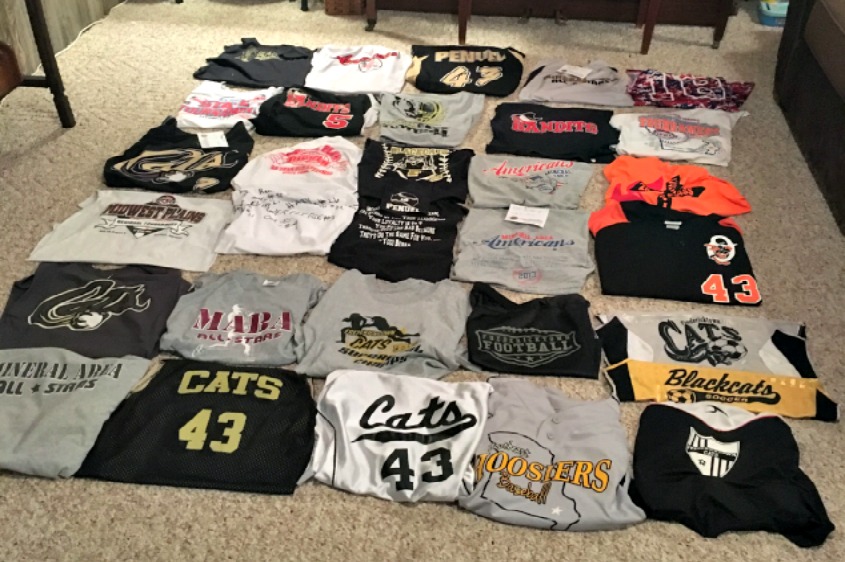
To get an idea of the layout and pattern for the quilt, I laid the shirts on the floor, took a picture and sent it to my daughter in a text for her opinion. This layout was changed many, many times before she and I were both satisfied.
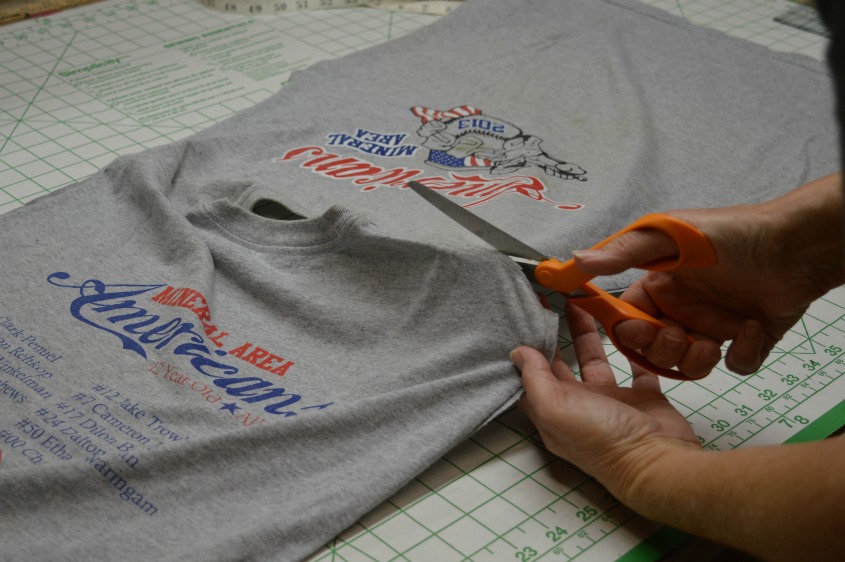
How to cut up t-shirts to make a quilt top
Now it was time to start cutting up the shirts.

I began by cutting away what was not needed such as the sleeves and the back of the shirts.
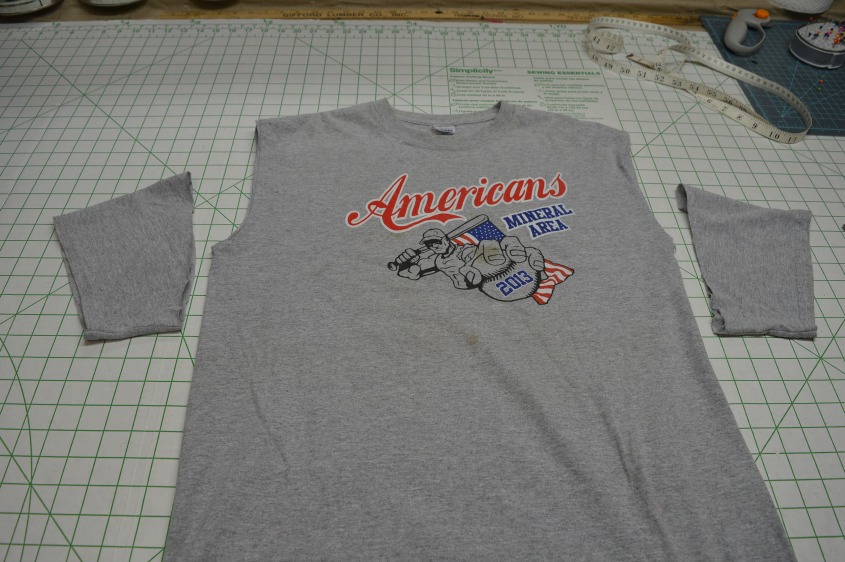
After the sleeves were cut off, I then cut the sides of the shirts from the bottom, up to the armholes on each side of the shirt.
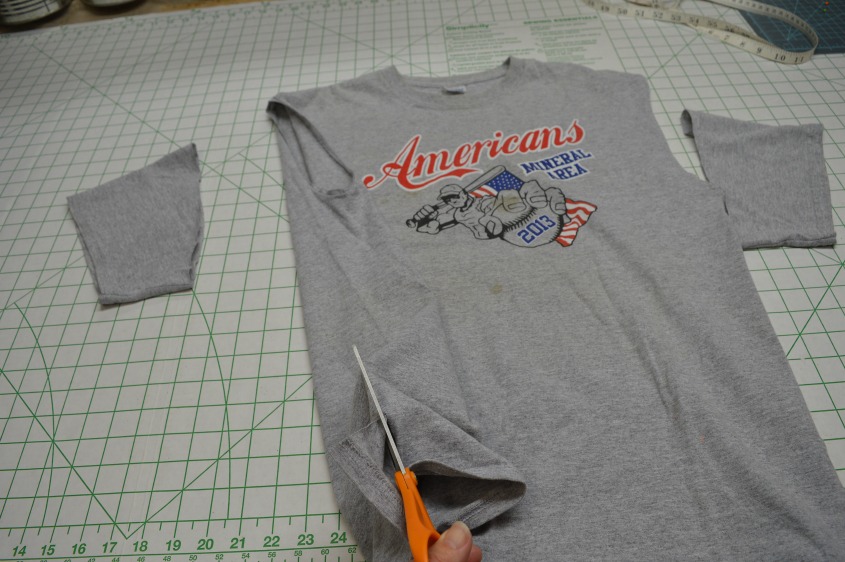
I then spread the shirt out and began cutting it apart at the shoulder seams.
However, there were five shirts that my daughter wanted both the front and the back included in the quilt in the same quilt block.
There were also a few shirts that had team patches on the sleeves she wanted cut out and appliqued onto the quilt block.
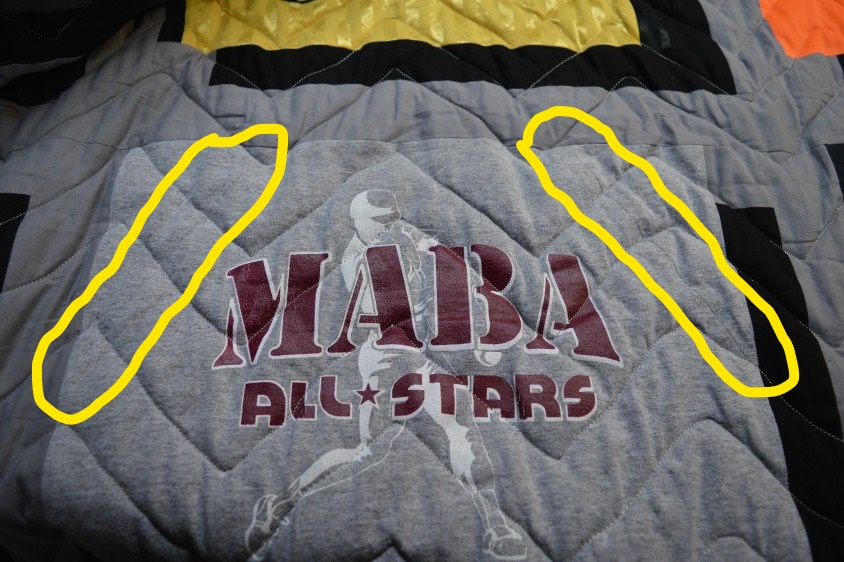
How to modify quilt blocks cut from the small t-shirts
Just a word of advice if you do a project like this – don’t throw away any of the t-shirt backs or sleeves until the quilt top is finished. If you’re having to use small t-shirts and large t-shirts like I did, you…will…need…them.
Let me explain.
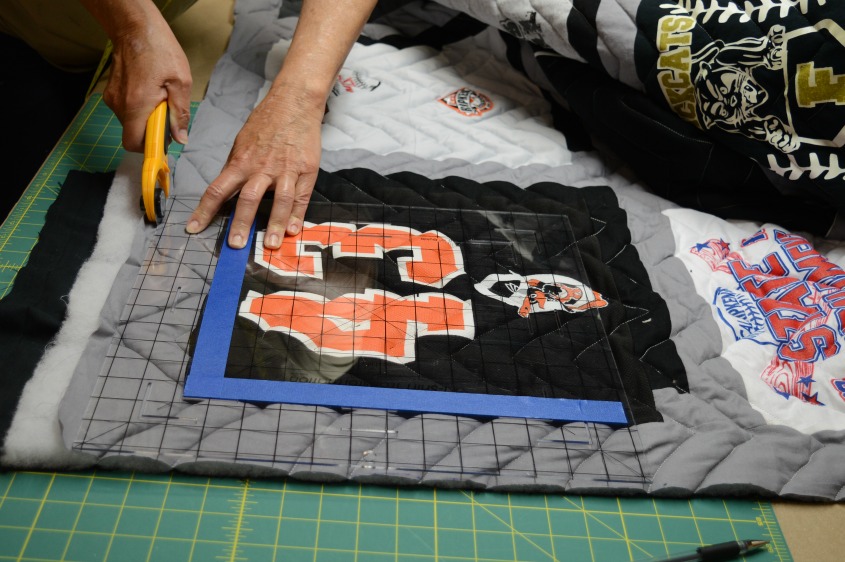
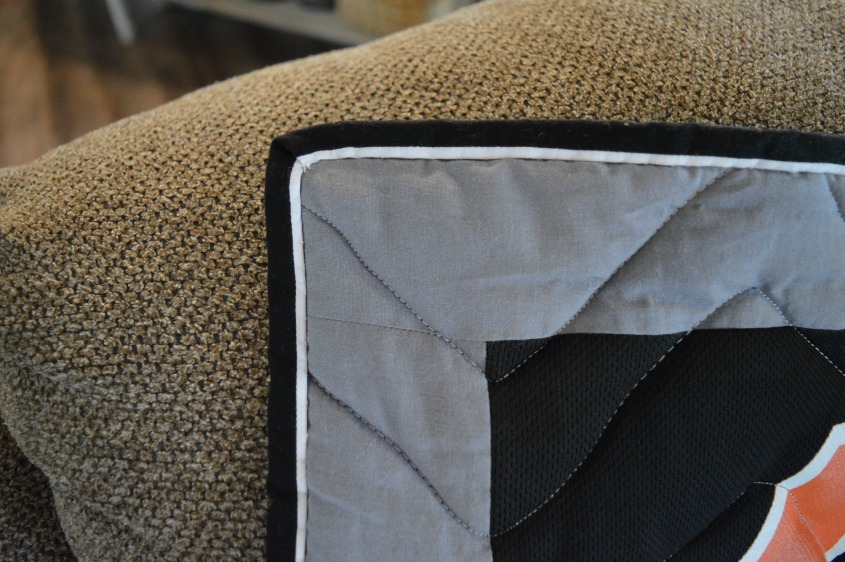
Those small size shirts did not have enough fabric to make a full 15” x 15” block. I cut a block as big as possible from the little shirt fronts.
Those back pieces that I saved from those shirts? I used those to cut pieces from to sew an add-on to the blocks in order to make a full 15″ x 15″ block.
The seams for the add-on barely show up in the quilt block, especially after it’s quilted. In the picture below, I highlighted where the seams are.
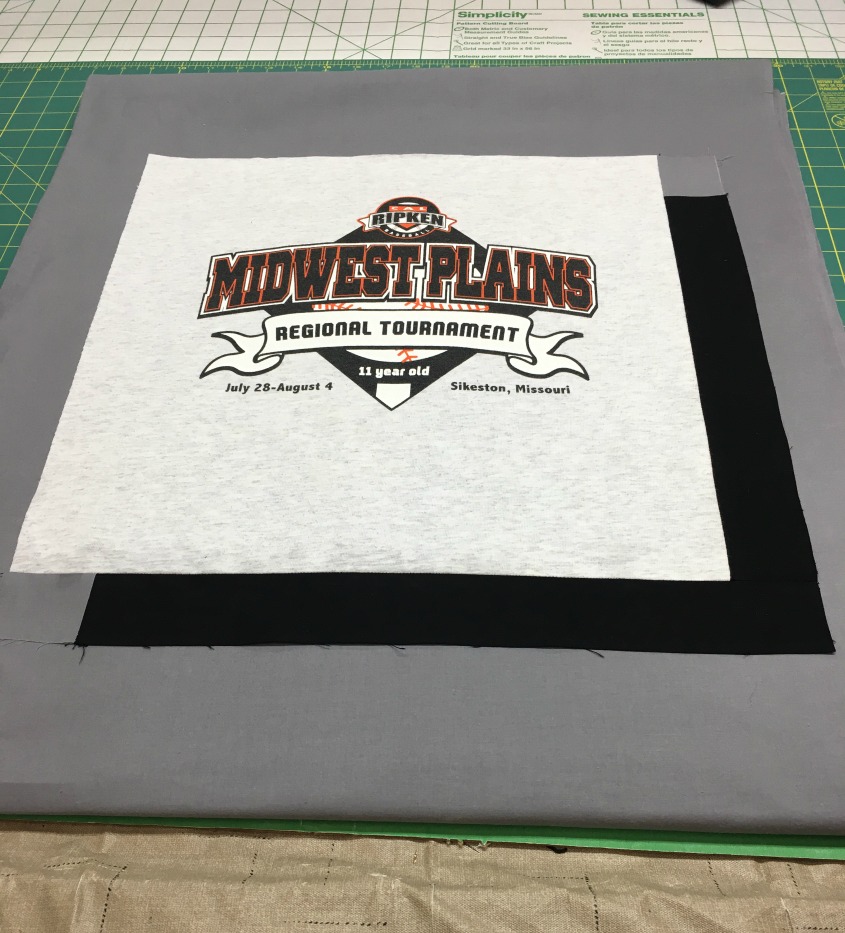
Shadow illusion quilt block pattern
During my research on how to make a t-shirt quilt top, I found a quilt block pattern called Shadow Illusion.
I really like that look and so did my daughter. I watched several YouTube videos to learn how to make them and it consists of black, gray or brown strips of fabric, ranging from 1″ to 3″ wide, sewn to two sides of the block. Below is one of those videos I found by Missouri Star Quilt Company demonstrating how to do the shadow illusion block:
The length of the strips are dependent on the size of your blocks. When I researched this quilt block pattern, I noticed different people placed these strips on various sides of the block, depending on their preference as to where they wanted the ‘shadow’ to be.
The picture below is the first block I made with the shadow strips. I chose to make the strips black, 1 ½” wide and sewn onto the right side and bottom of the block. The actual cut width for the shadow strips is 2″ to allow for a ¼” seam allowance on both sides of the strip. For each strip cut, I also cut a 2″ x 2″ square from the gray fabric that will be used for the sash strips between the blocks.
The 2″ x 2″ square of gray fabric is sewn on to the end of the black strip of fabric before sewing the shadow strip to the quilt block. That’s what makes the illusion of a shadow. I placed the block on a piece of the gray fabric to give me a preview of how it was going to look for the quilt.
Shadow blocks are not hard to do, but they do take a little more time. However, they are so worth it. The black shadow strips seem to lift the block up off of the fabric.
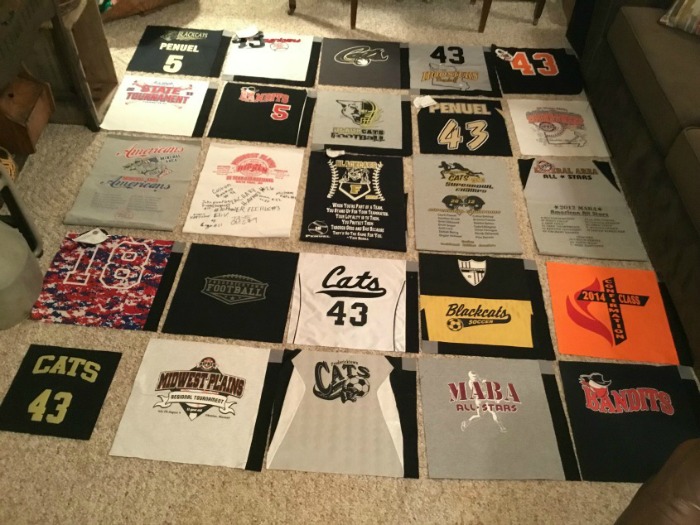
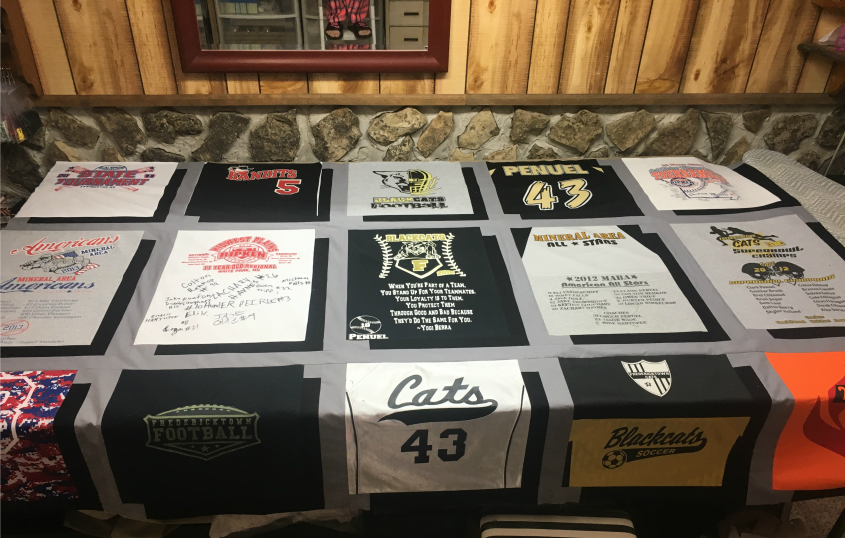
Double check your quilt block layout before sewing
After all the blocks were cut out of the shirts and I was in the process of sewing the shadow strips to them, I laid them on the floor one more time. I just wanted to double check the layout that my daughter and I had decided on before I started sewing the blocks together.
Guess what? I didn’t like it. Really glad I checked. (Thank you Jesus) The black shirts, in my opinion, needed to be distributed a little differently.
You don’t want to finish a quilt top then stand back looking at it wishing you had changed the layout a little. The picture below is what I was finally satisfied with.
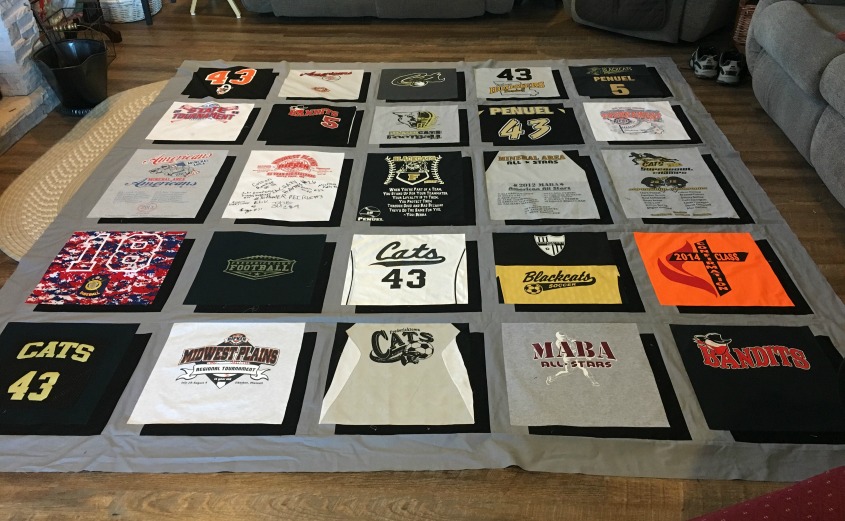
Different size quilt blocks
After all the blocks were finished, I began sewing them to the gray sash strips. After two rows were sewn together, I took the picture below. Notice that the blocks in one row are a little longer than the blocks in the other row.
I mentioned earlier that my daughter wanted fronts and backs of five of the shirts in the quilt, and team patches appliqued on. Those shirts are in the row with longer blocks. They had to be a different size in order to include all of the graphics that were on the front and the back of the shirts. The blocks are 15″ wide like all the others, but they are 22″ long.
Three rows sewn together here and as you can see below, I chose to place the longer blocks in the middle row of the quilt.
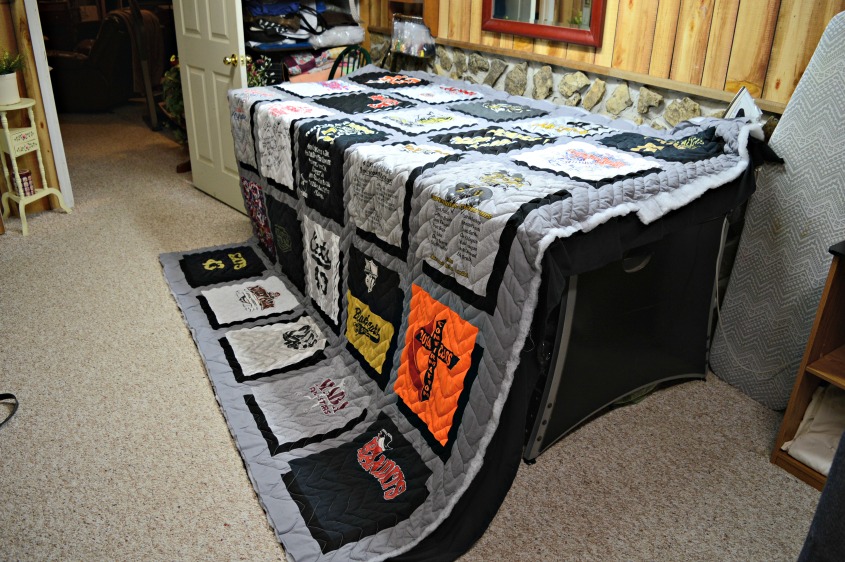
T-shirt quilt top ready for quilter
All five rows now sewn together and ready to be quilted. When I took it to the quilter, I told her she would not need to bind it because I wanted to do that. (She seemed pleased about that.)
The quilter had the quilting done ahead of schedule and she did an awesome job!
Quilt border preparation for binding
The gray sash strips in between all the blocks are 2″ wide, so I wanted the gray border around the perimeter of the quilt to also be 2″ wide. I decided to allow a ½” seam allowance on the border for sewing on the binding.
Normally, you would allow a ¼” seam allowance, but the batting makes it so puffy, I wanted a little extra for good measure.
I measured 2 ½” from each block and marked it with a fabric marker, then cut off the excess with my rotary cutter. (I put painter’s tape on my ruler at the 2 ½” mark to make it easier to find the right measurement each time I moved the ruler.)
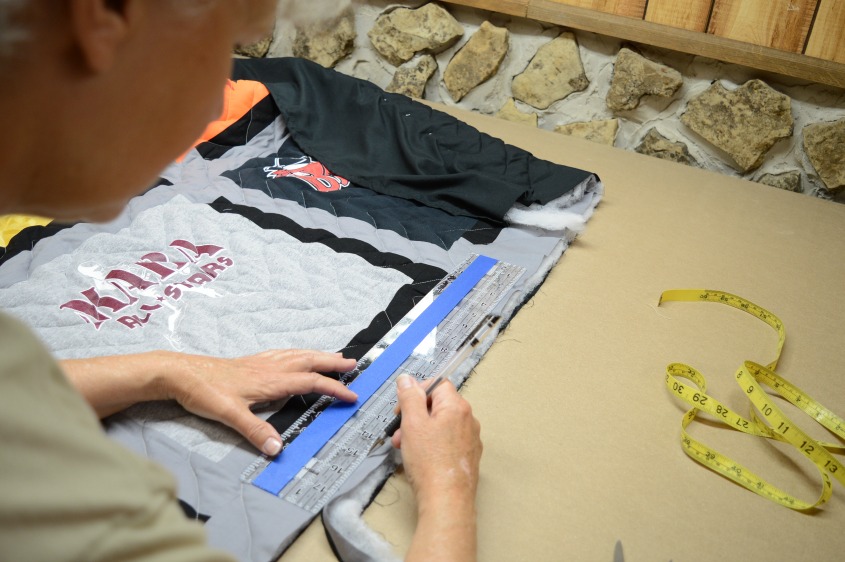
Squaring off quilt corners before binding
This is important. The quilt and the quilt binding will look nicer if the corners are square. I used my 15” square ruler for this. (Gosh, how did our great-grandmothers do this?)
Once again I put painter’s tape at the 2 ½” mark and lined up the tape with the quilt block corner that was in each corner of the quilt. After squaring it and marking it, I cut away the excess with a rotary cutter.
How to calculate length of binding for your quilt
After all sides were trimmed to 2 ½”, I began to calculate what length the binding needed to be.
To do that, you measure all four sides of your quilt, add all four measurements together, then add 10 inches. The extra 10 inches is needed for mitering the corners, and for the seam allowance needed when sewing the ends of the binding together where they meet.
Quilt top binding tutorial by Missouri Star Quilt Company
By the way, while the quilt top was with quilter, I did research on how to bind a quilt. If you’ve not had a lot of experience binding a quilt, I recommend you watch a You Tube video by Jenny Doan with Missouri Star Quilt Company. Below is the video that helped me:
Flange Binding
The type of binding I decided to do is called flange binding, which looks like it has piping. Jenny Doan has a very good video for this too. I have learned so much watching her videos. She is a fountain of knowledge. Here’s the video for the flange binding if you’re interested.
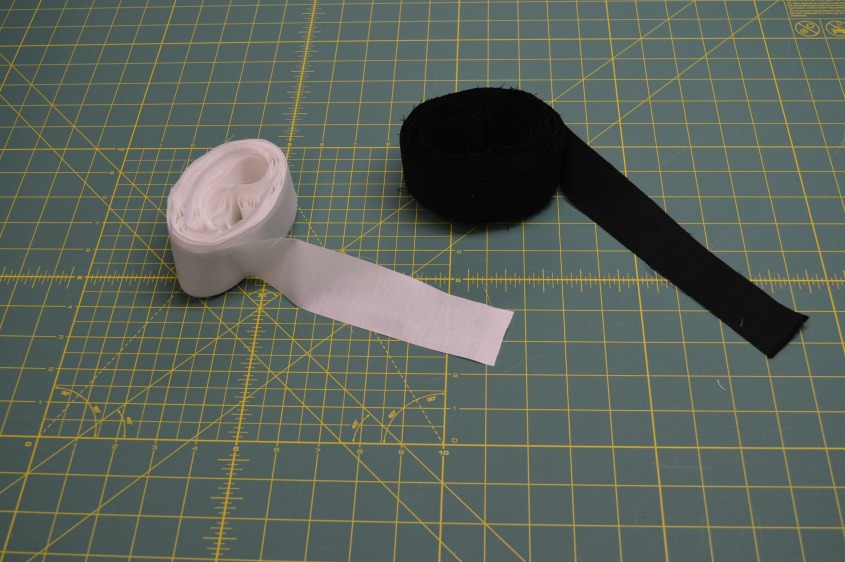
Preparing fabric strips for flange binding
Below are the strips for the flange binding. The white strip of fabric is the flange color and it is cut 1¾” wide. The black strip of fabric is cut 1½” wide.
They are rolled up in this photo because they were very long…420 inches. For me, it’s easier to sew long strips together if they are rolled up and under control like this.
I won’t be doing a step-by-step procedure on how to sew this flange binding, because Jenny Doan’s video is the best resource for that.
Sewing fabric strips together for flange binding
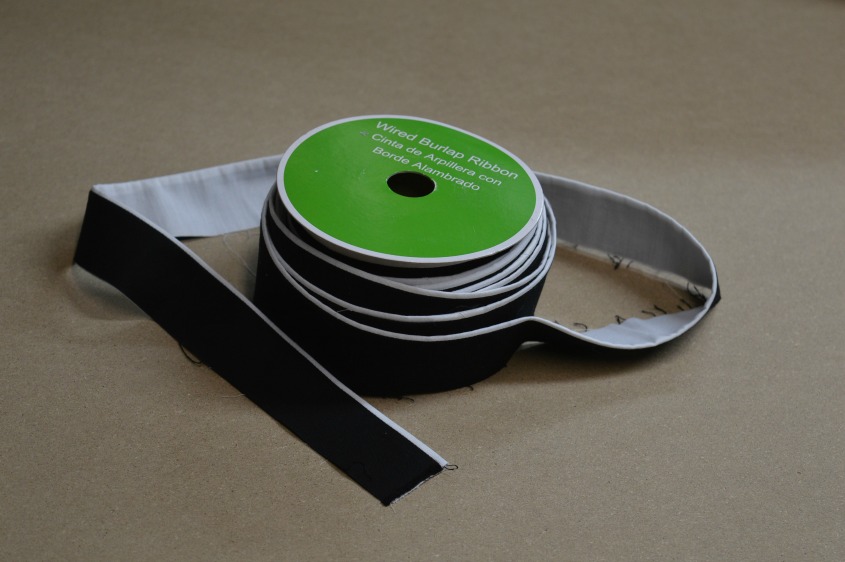
With right sides together and raw edges even, I sewed the black strip of fabric to the white strip on the side where the raw edges are even. Then I turned right sides out and ironed flat with raw edges even.
This is when the binding starts to look like it has piping. I rolled the binding up on a cardboard spool that had once held ribbon. This kept the binding tangle-free and controlled while I was measuring it, as well as when sewing it onto the quilt.
Measure the length of the binding to ensure there is enough to go all around the quilt with at least 10 inches extra.
Trust me, it’s better to have more binding than you need, than not enough. I have put binding on smaller projects, and not having enough to finish is a big pain.

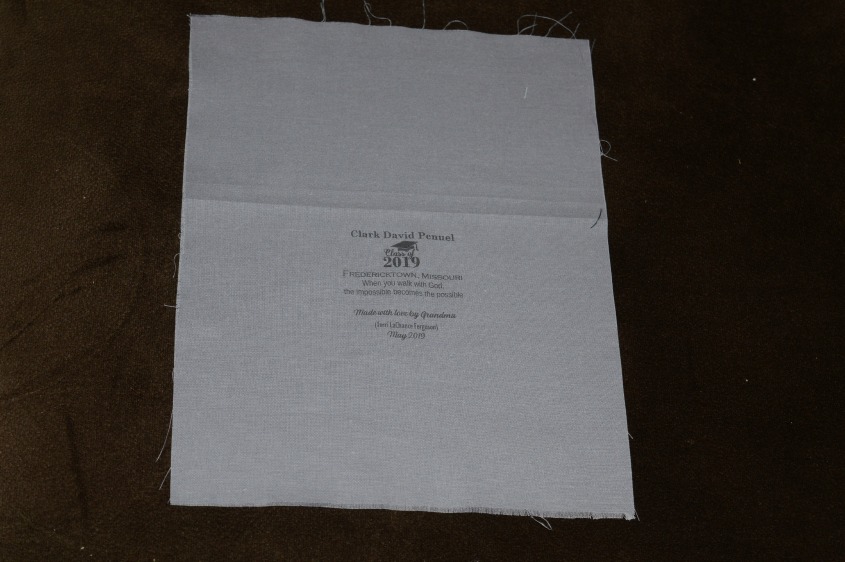
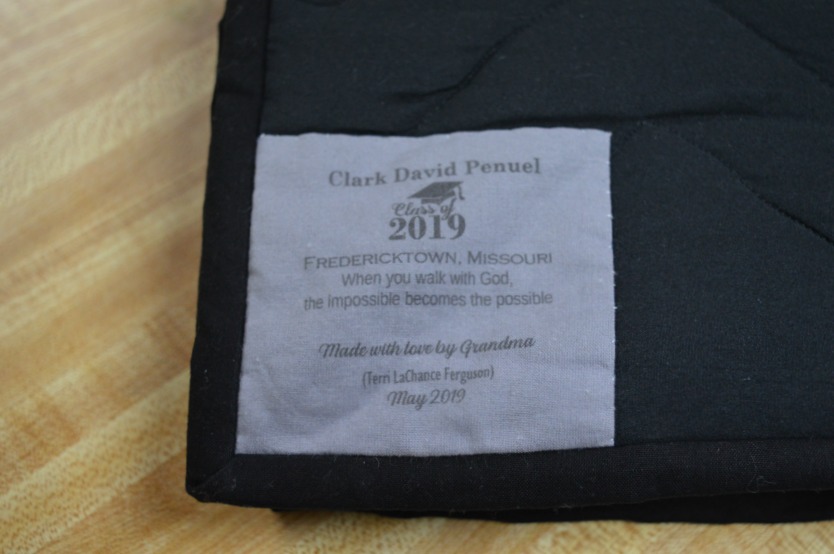
DIY quilt label
Before you start binding your quilt, please consider putting a label on the back of it.
A handmade quilt is such a precious heirloom. More than likely, years down the road, your quilt will be found by someone in your family who will want to know the history of that quilt.
Information to include on a quilt label
Your label should say who the quilt was made for, why, when and where it was made. Also, your name should be on there as the person who made it, such as Made by_______ or Made with love by______.
Because I’m a genealogist, I’d also suggest including your maiden name. You may want to include your relationship (if applicable) to the person you made it for, but you can personalize it however you want. The picture below shows the label I created for my grandson’s t-shirt quilt.
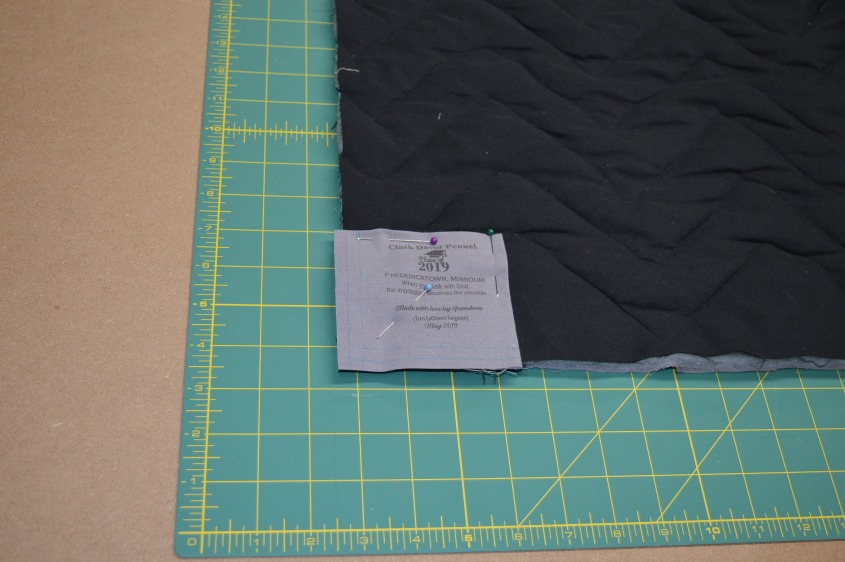
DIY quilt label using freezer paper
I made my quilt label using freezer paper. This tutorial will show you how to do that.
- You create your label in a word processing program on your computer.
- Cut fabric of choice to the size of printer paper, which is 8 ½“ x 11″.
- Cut a piece of freezer paper to 8 ½“ x 11″ and iron the fabric onto the waxy side.
- The fabric will fuse to the freezer paper after ironing.
The fabric is now suppose to feed into your printer and print out the label you created on your computer.
However, it jammed up in my printer the first few times. I finally got it to feed through without jamming by placing tape over the end that feeds into printer.
After successfully printing it off, I sewed the fabric into a square. As shown below, I pinned it into the bottom corner of the quilt. The binding will be sewn over the side and bottom of the label and I will hand stitch the other two sides of the label to the quilt backing.
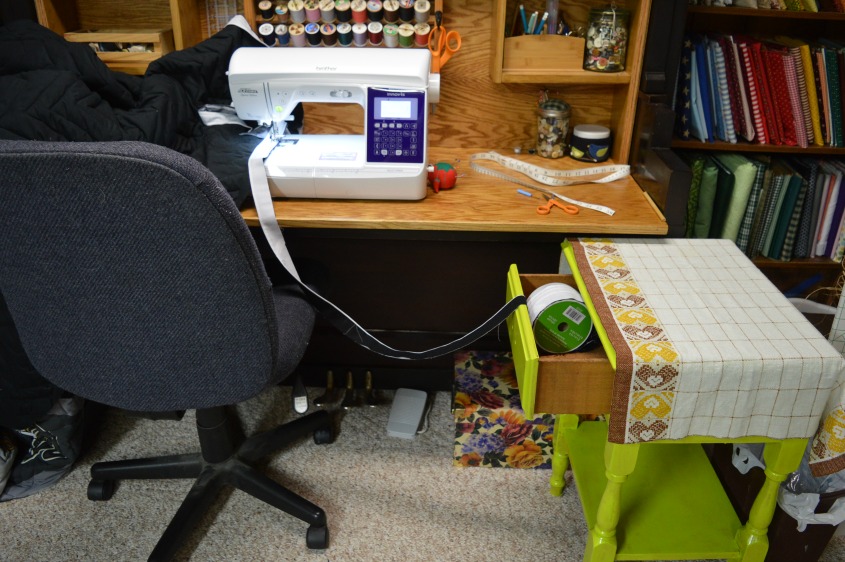
Tip for machine sewing lengthy quilt binding
Before I started sewing the binding onto the quilt, I placed a small table with a drawer in it next to my sewing machine. I placed the spool of binding in the drawer and it unrolled nicely as I sewed.
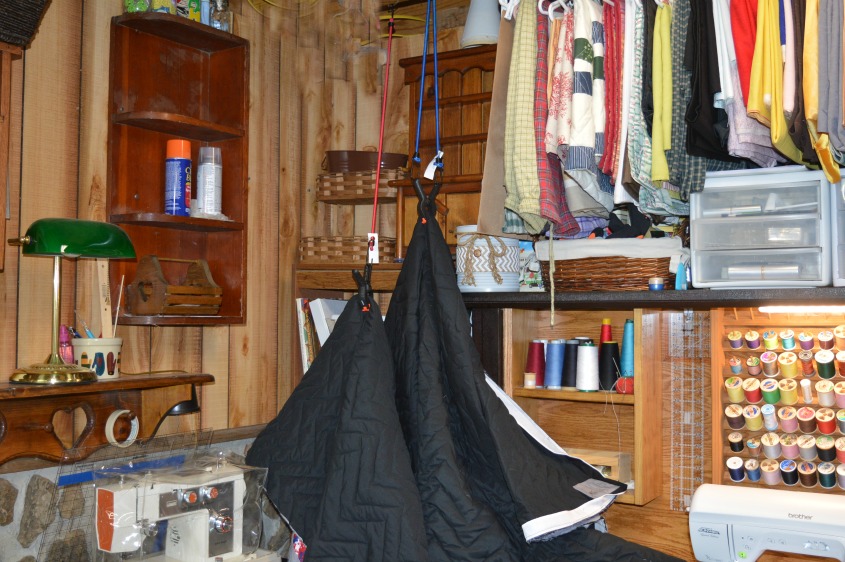
Tip for handling the weight of a large quilt while machine sewing the binding
Here’s a tip I learned during quilt-making research – how to support the bulkiness of your quilt while you’re machine sewing it.
Using bungee cords and plastic clamps. (See picture below) Of course we all have different sewing room designs. My sewing room is in our basement.
I hang one end of the bungee cord hook from a ceiling joist brace that is close to my sewing machine. A plastic clamp is hanging from the hook on the other end of the bungee cord. I just clamp an area or areas of the quilt where needed.
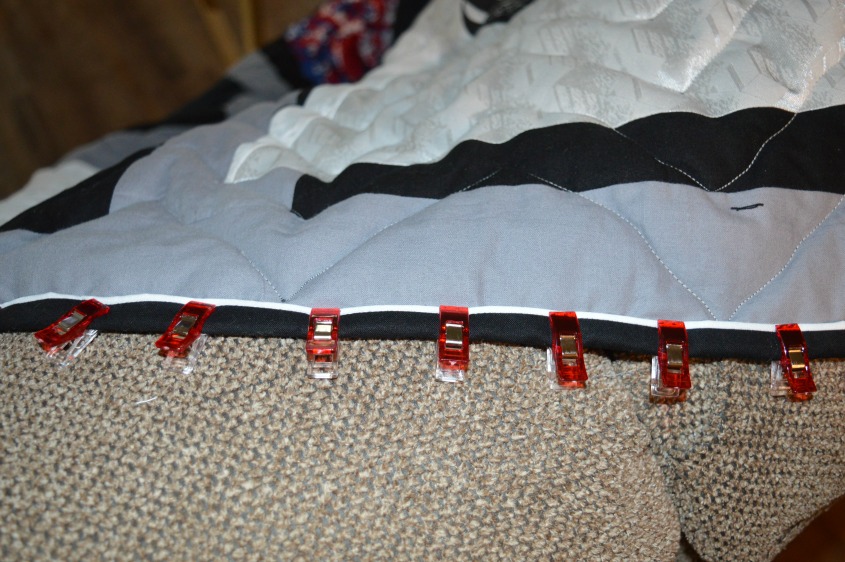
Hemming quilt binding
After the binding is sewn onto the quilt, it now needs to be hemmed. This can be sewn on with a sewing machine, but if I have the time I prefer to hand hem.
I did have time to hand hem this quilt and it went faster than I thought it would.
I used the evenings while watching television to do the hemming. It only took three evenings to complete it.
When folding the binding over to the front side of the quilt to hem, you could use straight pins, but these little Wonder Clips are awesome to hold it in place.
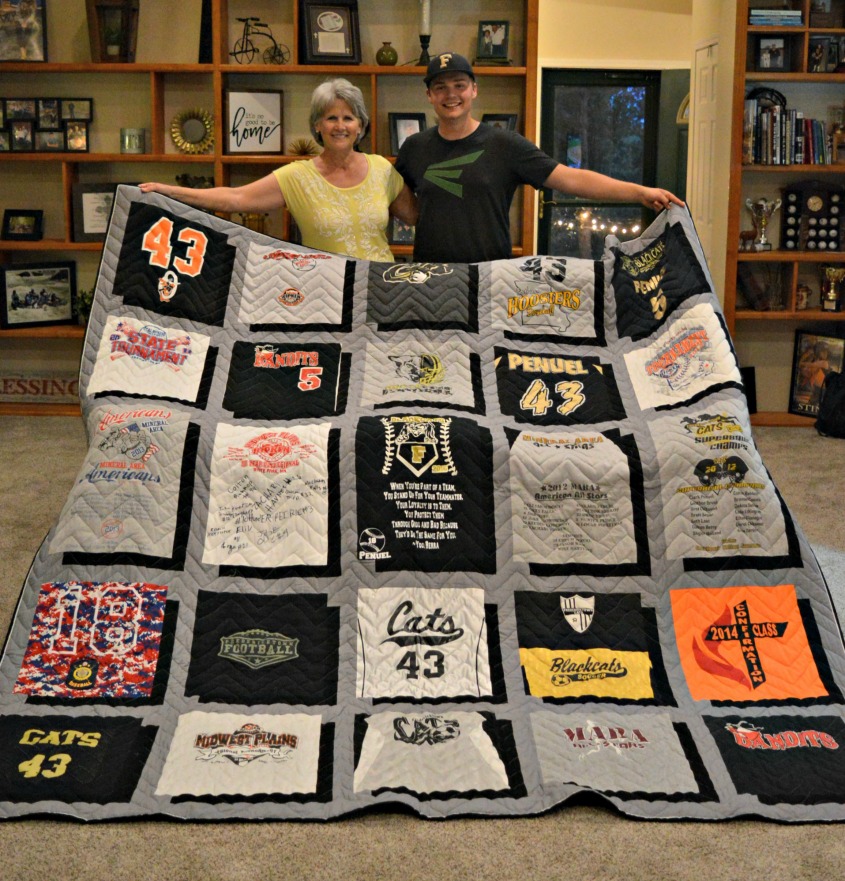
T-shirt memory quilt finished!
The hand-hemming is all finished. The flange binding goes really well with this t-shirt quilt.
Below is how the label looks on the back of the quilt after the binding is sewn on:
The t-shirt memory quilt is ready for our grandson!
I think he was very pleased.
I would love to see pictures of your quilt creations!
Love sewing projects?
If you enjoyed this post, please watch for my upcoming projects.
I am so impressed with you and taking on this first time project. The love of a Christian grandma is priceless.
Such a sweet comment coming from a very sweet lady. Thank you Jayne and thanks for visiting my site!
Hello. I’m doing research on a T-shirt quilt and so far your page has given me more info then any others. So Thank You
You said you had 31 shirt but I only see 25. Did you use any on the back of your quilt? I was thinking about doing some on the back of mine.
Thank you Lisa. No I didn’t use any shirts on the back. For A few of the blocks, I included two shirts. And while cutting and piecing together, my daughter and I decided not to use some of the shirts because they wouldn’t all fit. The quilt was getting quite large. I would love for you to send me a picture of your finished quilt top!
I hope to start mine in a week or two. Can I ask how much of the interfacing you bought? I’m only asking because the nearest store is 30 miles away. Thank you for your help.
Sorry I don’t know the exact number of yards I bought, but my blocks were 15” x 15″ and I cut a square of the fusible interfacing a little larger than that to iron onto the wrong side of the t-shirt front before I cut the block. The square pieces of interfacing I cut were probably about 17” x 17”. Since the Pellon 906F fusible interfacing I used is 45” wide, I could get four squares cut from each yard of interfacing. There are 25 blocks in the quilt so I would estimate that it took between 8-9 yards of interfacing for my quilt. Your amount needed will depend on the size of your blocks and the number of blocks. Hope this helps you determine the amount of yards you need!
It looks like you might of had a few tank tops that you needed to add extra material arm holes and sides. I like the way you did yours. Did you use extra t-shirt material or did you use the same black cotton fabric that you used for the “illusion” strips?
Thank you! Yes I did have to add extra material to some of the t-shirt blocks, but I didn’t use the black cotton fabric that was used for the illusion strips. I used the extra t-shirt fabric that I kept when I was cutting up the shirts.
Thank you for the information. I do have a couple more questions. I see you sewed two t-shirts together to make one block. Hope you don’t mind.
1. Do you cut the blocks down to size before you attach the two shirts? Or do you sew them together and then stabilize?
2. Do you stabilize the shirts before sewing them together? Or do you sew them together and then stabilize? I was wondering about the bulk along the seam.
Appreciate your input. This is the first t-shirt quilt and I think I’m almost ready to begin the cutting of the blocks once I decide on the above. Thanks
Great questions! I’ve learned to always cut bigger than I need so the blocks I cut from the t-shirts were oversized. However, I did iron an oversized square of stabilizer on the back of the shirt fronts before I cut out the oversized block. Regarding the two shirts in the same block, I also cut those larger than needed and stitched them together before ironing the stabilizer on the back. I then cut it down to size.
Hope this was helpful and I don’t mind at all if you have additional questions. I would love to see a picture of your finished quilt top!
love this! Making one for my dad…it was an inspiration. Ty so much!
Thank you Diane! I would love to see a picture of it when you’re finished.
You have written such a great tutorial!! I have made 2 t-shirts quilts (one when I was in college, and I sewed the tees together by hand!) I just recently (in March) learned to use a sewing machine and I’m still learning but I learned a ton from that first one I made! You have some amazing tips!! And I was the same as you on both of the ones I’ve done, I rearranged those tees sooo many times! Lol! Now I’m excited to try out the shadow idea! Looks so cool! I have a lot of black tees, so maybe I’ll make the shadow a lighter color!
Thanks for this! (I live in Missouri too!)
Thank you so much Morgan for your comments! If you do a quilt top using the shadow effect, I would love to see a photo of it. Hats off to you for sewing a t-shirt quilt top together by hand. That’s amazing! I have never tried that, but I would like to try hand-quilting some day. A current project I’m working on is a lap quilt using the ‘quilt as you go’ method. It’s pretty time consuming but I’ve enjoyed doing that. Hope to hear from you again soon!
Hello, I’m excited to begin my quilt for my grandson. I am wondering the width of your sashing strips? Thank you.
Hi Louise! So glad to hear from you! The width of my sashing strips is 2 inches. The actual of cut, of course, was 2 1/2 inches.
I am working on my quilt with the shadow effect. My question is if you have any tips for connecting the rows
Thank you so much.
Yes, I think I might. I wanted all vertical seams of blocks in the rows to line up in the quilt, but it’s a little more difficult to line up seams when there is a sash strip between the rows. Before sewing a row with a sash strip to another row, I would place a straight pin in the vertical seams of that other row in the raw edge where the seam would be when the rows were sewn together. I would then place the sashed row on top of that row, raw edges even and right-sides together. I then used a ruler to line up the vertical seams of the row laying on top with the straight pins that I had placed in the vertical seams in the row laying underneath. Pin together and repeat for each vertical seam in the row.
Hope I explained this clearly. If not, please let me know.
Would you be willing make a quilt for me? I do not sew but absolutely love your design. I have a child that is graduating soon and I think that would be a wonderful gift.
I’m so sorry, but I’m currently working on a t-shirt quilt job and I have two more quilt jobs after this one. Hoping you can find someone else.
Another tip I found is to determine which way the t-shirt stretches the most. Then see which way the interfacing stretches the most. Apply the interfacing so its stretchiness is opposite the t-shirt stretchiness. So, if the t-shirt stretches side to side, put the interfacing on so that its stretchiness goes top to bottom. It helps a bit more to keep the t-shirts from stretching when you sew them.
Great tip! Thank you!
My Husband passed away 4 months ago and I am going to make our children, each a tee shirt quilt of Dad’s. I love the shadow lift your quilt has I plan on trying it. Your quilt is beautiful I’ll send you pictures of mine when I get them done. Bless you and yours.
So very sorry for your loss. Your children will cherish what you are doing for them. I have made another t-shirt quilt since I made this one for my grandson and I have been asked to make two more. I would love to see pictures of your quilts! God bless.
Going to start my 1st T shirt quilt and I have a couple of questions. What was your seam allowance on your T shirt quilt? Also, what type needle did you use on your sewing machine? In sewing the T shirt materiel together to make the block size needed, did you use a stretch stitch? Thank you
I used a normal 1/4″ seam allowance with a 75/11 needle. No, there was no need to use a stretch stitch because the fusible interfacing I ironed onto the back of the blocks kept the t-shirt fabric from stretching. Hope all goes well with your first t-shirt quilt!
I’ve been quilting for a number of years and just made my first t-shirt quilt using your tutorial. Excellent instructions and tips! Would love to show off my finished quilt if there was a link to do so. I give you total credit for inspiring me.
Well thank you! I’m so glad my tutorial was helpful to you.